Showing posts with label Living Room. Show all posts

Sunday, March 23, 2014

Living Room Progress | Decorating on a Tight Budget at a Snail's Pace

I am SO behind on posts on this blog, its unreal. I have so many projects finished and/or in the making that I could share. Or overshare? But as I say on a daily basis, there just isn't enough time in a day. I don't sleep much. But still, I could use about 8-12 more hours per day. But I'd have to drink 3 more cups of coffee per day and that's not good.  At this point in my life its hard to believe that a few years back I went three years without caffeine. And now I might as well have an IV. Oh well. Enough about that. Time to talk living room progress.
I have taken my sloooooooow, sweet time on our living room...and that is actually a really good thing. I had a totally different vision in my mind for our living room when we first moved in...so I am pretty glad I took my time. This makeover is three years in the making and still not quite finished.

Let's take a look back. This is how this room looked when we first laid our eyes on this home. Not my thing, but it worked for them. And we bought the house so that worked for them too. Except we got a sweet deal. Yay for us.


Then here was the living room right after we moved in. EEK! No better than their version. We had no plans of it staying this way....this was just a temporary arrangement while we completed our family room makeover. Look at little Coop! I can't believe he was that little when we moved in.


Yikes. This is pretty bad too...but honestly....this was just where everything landed temporarily.


Here are a few shots of the then unappealing entryway. Eww. I have had plans to put a gallery wall here since we moved in and three years later it still hasn't happened. I may have changed my mind now.


One of the first things I did in that space was add this skinny little bench. I found it on craigslist for $20. It was dark wood and had giant feet that stuck out of the front and back but a friend I work with cut those off for me and I painted it white. Spray paint and Safecoat Acrylaq are my friends. You can also see here I got a new rug. I pulled the new wall color out of that rug...I actually don't think it will live there much longer though, because now I want something bold and bright!


In this next shot, you can see the light fixture. Brass. And crystal. Not my favorite. That will go sooner than later. I want something funky like this but smaller. You also have a view here of our old, dated front door and a tiny glimpse of another furniture steal scored through a cyber-friend who I met on craigslist. I know. Kinda weird. But in this day and age is it really that weird? Anyway...Kirsten is an uber-creative furniture painting gal. Check out her stuff on her blog. Unfortunately she doesn't live here anymore, but if you happen to be in or near Fargo, you could snag up one of her fabulous upcycled creations. 


Next is the view looking toward the entry and down the hall toward the bedrooms. Sandwiched by these two areas is one of my treasured family heirlooms: my great-grandmother's piano. 


After this dresser found a new home in my bedroom and the dresser from the master bedroom ended up in the girls' room...this old heirloom from my other grandma, affectionately named Gigi, by my kids, ended up in the entryway. A few years ago, I actually found a photo of an identical dresser in Lonny Mag, one of my favorite magazines to shop for design inspiration.  The dresser was being used as a bar in a dining room, which reassured me that repurposing this dresser as an entry console was a great design choice. On the right you can see our new and improved craftsman style front door. 

Last spring, I finally got around to changing the paint color in my living room, entry and hallway. I went with a grey, one shade darker than my dining room. Don't have the name right now but I will come back and update soon.  I can tell you its Olympic Brand from Lowe's because they have low VOC paint at a great price. It turns out to be a bluish gray, which wasn't necessarily what I was going for...but it works... and when I found this beauty staring back at me at one of my favorite consignment shops, I knew the bluish tone was meant to be. We also purchased a new rug from Joss and Main around that time which you can see here.


I found these cute metal tables at Target.  I tried out a few different lamps and shades from Target and Marshalls before deciding on the sleek, mod white lamps from Target and a plain white drum shade with teal stripes along the top and bottom edge.


I found the ikat storage bench on Joss and Main, which I loved because it pulled in the blue from the couch and offered so much storage for our sheet music and even a few blankets.


Then I found these curtains on overstock and I was thrilled, because I had originally planned to hunt down that material and make them myself.  When I came across them on overstock, I knew it had to be fate. Right? Now if you are a design blog stalker like me, you will start seeing this print everywhere, but that's okay. I love it anyway.

Next came these white chairs, that I scored on craigslist for a steal. Its all starting to come together, don't you think?


Here's the view down the hall, before I updated my hallway gallery wall. More on that later.


And here we have the view from the door, with a photo bomb by my baby and my fur baby.


The final touches in this living room makeover happened in the last two months, and although its not completely finished (am I ever really done?)  I finally feel like this is the livable living room that I've been dreaming of.  I found the marble coffee table on JCPenny online, of all places.  I also got it for a steal. Its originally $675 and on clearance for $299. I bought it when they were having a site wide sale, so I think I paid $219 and had free shipping too. Booyah.  The moroccan ottoman poofs are really popular right now and the real leather ones usually go from around $200 each on sites like One Kings Lane and Joss and Main or $275 on JonathanAdler.com.  I found them through a private seller in Morocco and got the pair for $80! They came unstuffed and smelled like an animal...I think they were seriously directly off the animals' back.  But a few weeks in the cold garage later, the smell was gone. I ordered the stuffing on Amazon prime and Voila... Just like their high-priced friends for less than a quarter the cost.


So there you have it. My living room makeover. Let's take one more look at the before and after to see how far we've come.


BEFORE


AFTER


BEFORE


AFTER


Monday, February 17, 2014

Living Room Chairs {Furniture Refab}

So  after I bought my vintage sofa and new rug, I was looking for some side chairs for my living room. I knew I wanted two of the same chairs to add some balance and I also wanted a mixture of old and new.


I've been seeing rattan chairs all over design blogs and magazines and something has really been drawing me to them.

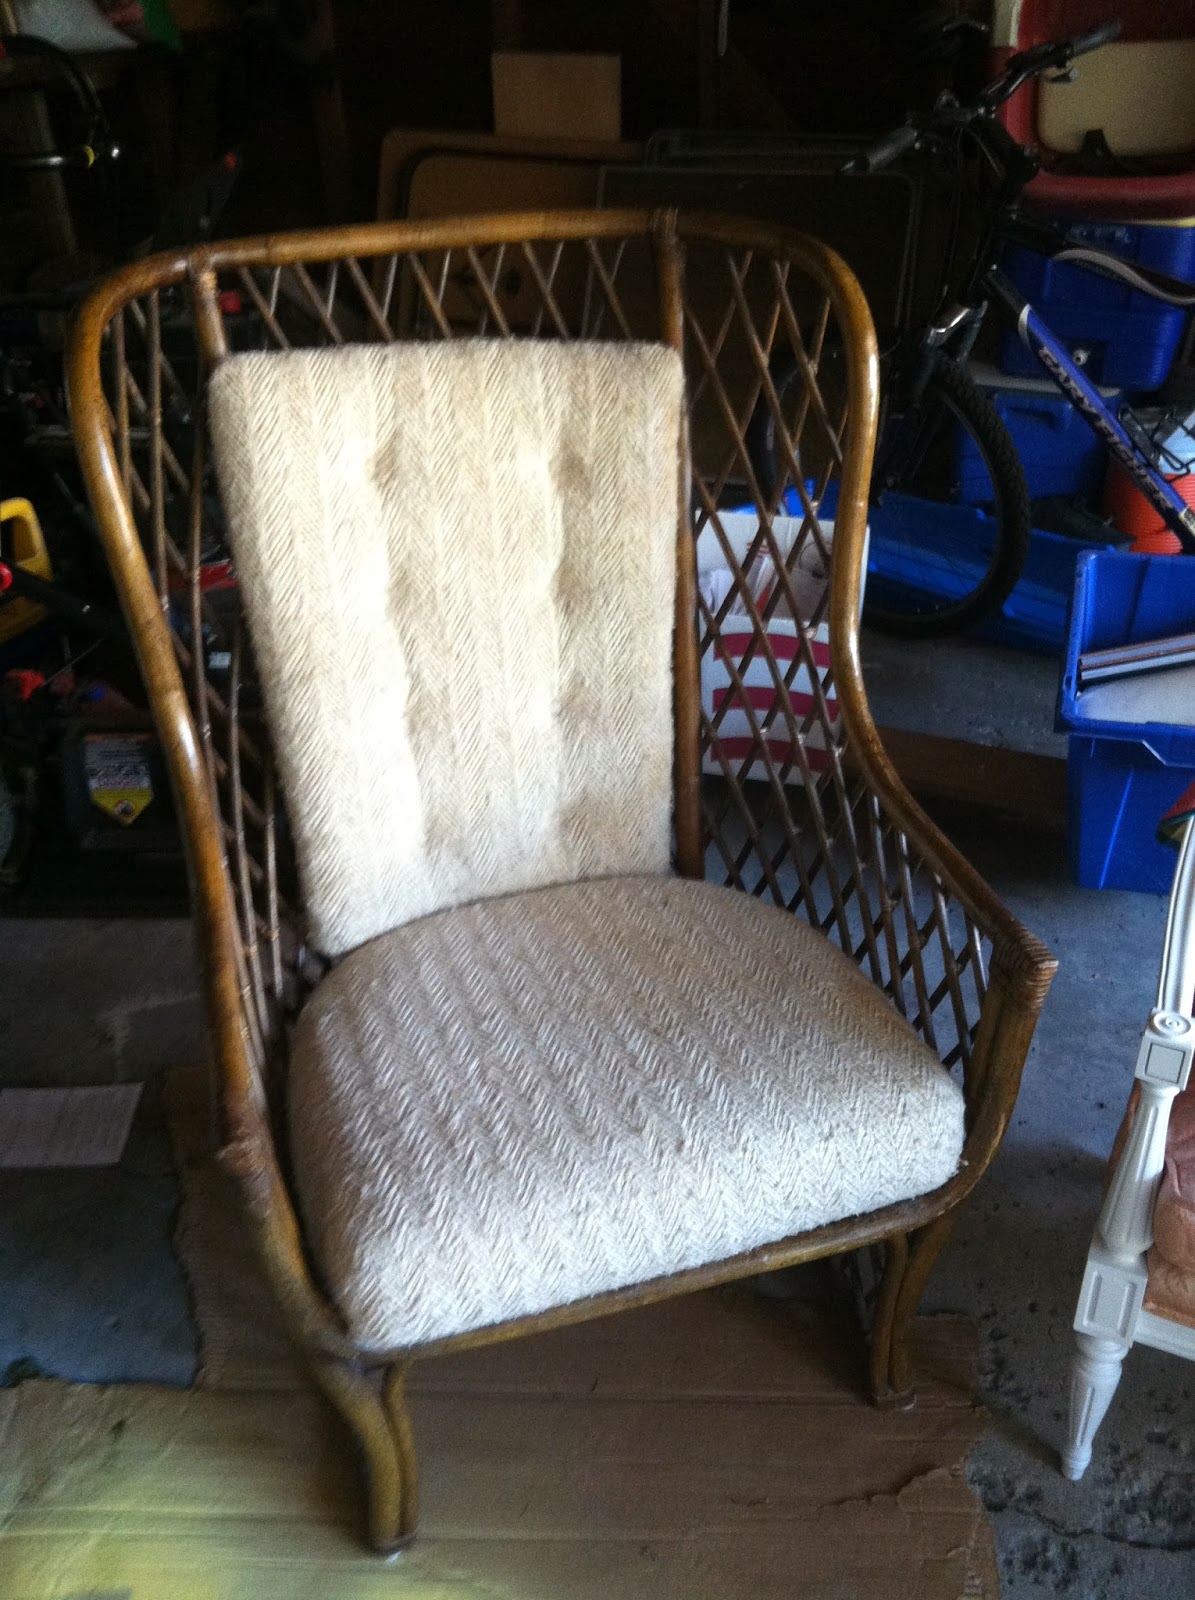
One day, I spotted this one on One King's Lane. I love the open 'airy' feeling of the rattan and the comfort of the big deep cushions.  But I also love the fact that this one is a wingback, so it feels a little more like it could shine in a formal living room rather than being sent off to hide in a sunroom. Unfortunately, the $999 price tag made this one WAY out of reach, especially since I needed two.


It was around that time that I spotted these two beauties fixer-uppers on craigslist and snatched them up for $80 for the pair. As you can see, they need some work, which really just amounted to a little paint and some new fabric.


I tossed out the upper cushions and removed the lower cushions from their covers and tossed them in the washing machine. I had this yellow chevron fabric that I purchased almost two years ago, not knowing exactly when and how I would use it.


This is where my mom came to the rescue...She made the cushion covers for me when I was home for Thanksgiving weekend. I had planned to do it myself, but its always faster when she does it. After all, she's the expert and the one with the awesome sewing machine. One day I will get one. Anyway, I helped. Here is the cording that we covered with the fabric.


And here is a completed cushion.


I added large grey down pillows that I found at TJMaxx for the back of the chairs and also these adorable, decorative handmade pillows, purchased on etsy from Caitlin of Bright July. I love, love, LOVE these pillows. We got one that says carpe diem and one that says besos. Both sayings have meaning for me, but besos has extra special meaning in our family. Yes, I am a Spanish teacher, so there is significance there...but also...all three of my children had besos as one of their first words. We always use the word besos instead of kisses, every night before bed. In fact, right now, I am certain Cecilia knows what besos are but not so sure if she knows what kisses are.  I love filling my home with things like this that have meaning for us, and also supporting artists on etsy in the process. If you don't know etsy, than you are living under a rock and you must drop everything and go check it out. NOW. 


So here you can see how my two completed craigslist beauties add some light and airy punch to my living room. I actually think they rival the One Kings Lane high-end version. In fact, I think I like mine better. And at less than 5% of the price, they are a home run for this 'almost there' living room. 


More to come...Stay tuned for a coffee table and some ottomans.


Monday, April 1, 2013

A Fireplace Makeover and some DIY Art

Shortly after we moved in, my fireplace looked like this:


I am fully aware that the art on the mantel isn't to scale. While it is much too small for this space, the framed art is a favorite of mine, a watercolor print of a bay in Cinque Terre. It's almost exactly the view that we had from our balcony in Vernazza, which was one of our many stops on our three week honeymoon in Italy. It recently found a home on top of our piano, but for our first few months in this house, it lived here.  However, first things first. I hate brass. So, it didn't take me long to find some black spray paint to take care of that fireplace screen. Of course it had to be high heat spray paint, to avoid problems when we have a fire. I believe I used this kind from Rustoleum. Anyway, that was a nice quick update and I like how this looked much better.


My most recent project was to create a huge piece of DIY art for above the mantel that would fit the space much better. A while back I found this awesome ornate gold frame at a consignment shop near my house. The shop is a little gem called Legacies Limited that I stumbled upon about 12 years ago, shortly after I moved to Milwaukee. Many of the wood pieces in my home are treasures I found at Legacies over the years.  And now that I live less than a mile away, I love grabbing a Saturday morning coffee and making a swoop through the shop to see what other vintage treasures I might find. Right now I am in the market for a cool twin bed that I can paint white to pair with the other beauty in the girls' room.

Anyway...Back to my art. So about a year ago I scooped up this frame for about $40. It actually had an oil painting of a ship inside it and when I first bought it, I popped off the frame and put the painting in my garage. For many months it hung empty over the mantel and at Christmas time I dangled some glittery red letters which spelled JOY inside it. 


For a long time I've had this idea for some DIY art and I knew I wanted it to include the Lyric, "All you need is Love..." one of my favorites for so many reasons, partly because its such a great mantra and partly because it reminds me of my childhood since my dad loves the Beatles and played their music often. My original idea included something organic with some strips of barnwood fastened together and painted with this quote... but the logistics of cutting the wood the right size and fastening it together made me procrastinate even getting started on the project...so when it ocurred to me that I still had the original painting from the frame, which was exactly the size I needed, my original plan evolved into something else that resulted in this...


Here were all of my supplies just before I got started.


First I loosely planned out the placement of the words, using some sticky letters and wooden letters that I bought at Micheal's.

 Next I began to Modge Podge the newspaper and scrapbook paper to the old painting.


When that was complete, I let it dry for several hours. Next I traced the large wooden letters onto some plain white paper and cut them out. Using some "repositionable" ( Is that a real word?? The stuff is actually called that!) scrapbook tape, I stuck the letters to the decoupaged canvas.


 Then using some leftover paint, I covered the entire canvas.


When I removed the letters, I had this masterpiece... Well, not so much a masterpiece, but it is a pretty nice "place-holder" until we can afford some real art.


What do you think?


Have you made any DIY art lately?