Thursday, December 12, 2013

A DIY Advent Calendar {DIY projects}

The kids have been asking me lately for an advent calendar. Of course they don't know that's what its called. I think the conversations have gone a little something like this:
"Mommy, can we get one of those things with the numbers on it with the candy inside?"
"What things with the numbers on it with the candy inside?"
"Those things with the numbers with the candy inside!"
"Honey, I don't know what you mean."
"Yes you do."
"No, I don't. Could you explain it another way?"
"Mommy, its kinda like a calendar, except it has doors and secret candies that you eat everyday."
"Oh, you mean an advent calendar?"
"Yes, I told you. Its one of those things with the numbers with the candy inside."
"An advent calendar"
Yes, an advent calendar."

So rather than buy one, I decided it would be fun to make one.
I bought the supplies for about $4 at Michaels. $1 each for the packets of stickers in the dollar bin and $2 for the pack of red envelopes. I contemplated buying some fun fancy stick on numbers, but I really didn't want to spend much so I decided against that. I already had the gold sharpie. I am kinda diggin' glittery and gold these days. So the sharpie fills that need with this project. :)


Anyway...when it was time to get started, Lucia helped me line up the red envelopes in 5 rows of 5. Then we worked together on sticking a sticker on each envelope. Pretty simple. Next I added the numbers with my gold sharpie.


When we were done with the stickers and numbers, we used mini clothespins to hang them from twine inside this frame, leftover from Cecilia's party and then it found a temporary home on the desk in our living room. 


I like it here. And it makes me smile. Did I mention that there is "candy inside those number things?" Yes siree. York peppermint patties. Mmmmm.

This was such a simple DIY project. It only took about 30 minutes and was such a fun way to spend some free time with my 4 year old. It kept her out of trouble for 30 minutes too. So thats two birds with one stone.


Oh. And that very same day, our elf, Plainty, found a temporary home too. Right inside the letter O on our Christmas mantle. Lucia got quite the kick out of that spot.


Tuesday, November 5, 2013

A Closet Makeover | Organizing with Labels

Does anyone else wish there was 24 hours more in a day?? Or that they were a vampire? Vampires never sleep right? Or do they sleep during the day?  Gee, now I don't remember what the dealio is with vampires because I haven't been getting enough sleep. But I sure wish I could function on less of it. My To Do lists are pages and pages long and I don't even know where to start... There just isn't enough time in the day. Common theme for all working moms, right? I have so many DIY projects in my head and I just don't have the time to do them. :( One day at a time. Actually I also have tons of completed projects that I haven't had time to document here and I really would like to...For some reason, it never feels like progress to me unless I take before and after pictures and write down what I did. Not sure why that is. I think because I am very visual. Am I nuts, or is there anyone else out there like me??? :) Bueller?

Anyway...here was a little Saturday morning organizational project I did while my youngest was napping and the older two were outside playing. It actually only took an hour or so...Not counting the time it took to shop for the baskets, crates and bins....

Here was my terribly unorganized hallway linen closet before...


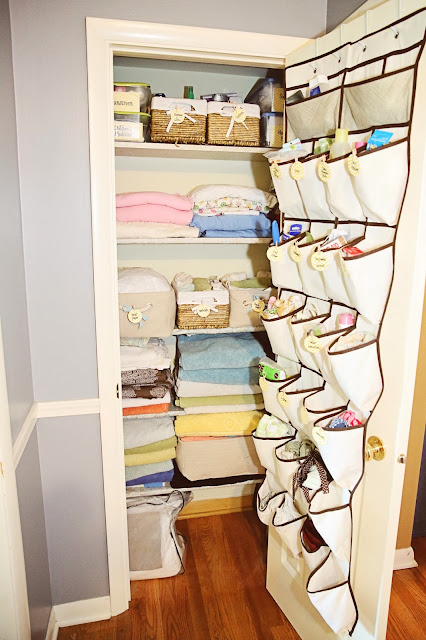
And here it was after. I didn't paint the hallway that day, obviously. I just forgot to take a before picture that morning so I found one from a few months back. 


Before and Afters like this make me so HAPPY. Sigh. Seriously makes my life feel a little easier to have an organized closet. And I LOVE that everything has a specific, labeled place now...and the hubs knows exactly where to find things...and where to put things back. ;) I know I got the "over-the-door-shoe-rack-for-something-other-than-shoes" idea from some other blog.....I just can't remember where. If I can find it I will add an update later. But seriously, isn't it genius? Maybe its a pinterest thing, but a couple years ago I had an "aha!" moment, when I realized that these shoe racks can serve SO MANY other organizational uses.

I am currently using one in my garage to hold cleaning supplies and one in my basement to hold extension cords and other miscellaneous items.  
This one here is my fave, though because there are so many things that I put in this closet that I want to be able to grab quickly, without having to dig in a bin off the shelf...


I made the circular labels by using my 2 inch hole punch on some yellow chevron paper I had laying around. I also have tons of the mini-clothespins, which work perfectly for clipping the labels onto the pockets and baskets.  I thought about using my label maker, or printing the labels on my printer, because I don't love my handwriting and I am a perfectionist like that...but then I remembered there isn't enough time in the day...and if I don't waste too much time on the labels, I won't feel so bad when I change things up and want to switch out the labels. I punched a bunch of extra circles and put some in one of the pockets with some extra clothespins, so I am totally ready for some new changes and categories as the need arises. 


The plastic bins on top just got a makeover with a piece of chevron paper slipped inside, with a label for the bins' contents. Easy peasy.


I had a little trouble figuring out how to clip the label onto the big rope handles on these fabric baskets until I spotted some extra linen ties that I had in an old bag inside the closet. Perfect.


Let's take one more look at that beautiful AFTER shot. Can you see me smiling? :)


Now I've got the itch and I want to tackle all the other closets in the house. But there's not enough time in the day. Sigh.

Saturday, August 10, 2013

A Mailbox Makeover | Time for some Curb Appeal

The other day as I was getting the mail it suddenly occurred to me that my mailbox was looking terribly tired and ugly. Eww. See for yourself:


When we moved in, the previous owners had their last name on the side of it with these cheap sticky letters from Home Depot....and when I removed them, the adhesive was all over the mailbox. I was too lazy preoccupied with other projects, so I just bought some of the cheapo letters to spell our last name and covered up the yucky adhesive with our name.

But as you can see, the letters haven't weathered the storm, so to speak. Wisconsin winters and a bunch of shaving cream from that time we got TPed kind of took their toll on the cheapo letters from Home Depot. The other side has our house number with some more durable, yet still ugly numbers.


Yikes. The post wasn't looking so hot either. Since this is one of the first things you see when you pull up to our house, it is obviously not giving the best first impression from the street. Clearly time for a makeover. I knew this would only take an hour or so, So I knocked it out while my littlest babe was sleeping one afternoon this week.


We don't get the paper version of the newspaper, so I took off the little sidecar. At least that's what it reminds me of. And since it is just constantly getting filled with fliers and papers that we put right into the recycling, I figure completely removing it may cut down on the clutter... hopefully the flier delivery people, whoever they may be will just skip us and over time we will even save a tree, perhaps?


The first thing I did was wrap the red flag in tinfoil and I sprayed the entire thing with primer. Rustoleum painters touch. My fave.


Next I sprayed just the mailbox in one of my favorite Rustoleum colors, Summer Squash in Satin finish.
I thought the white post would look nice with the new white trim on our house.


Hmm. But something just wasn't right... this color combination wasn't sitting well with me and the post was going to need many many coats of white to look right. So I sprayed the post with some Rustoleum black in a flat finish that I had sitting in the garage.


Okay, so I like the post much better but the yellow and black combo felt too bumblebee to me... So I busted out my trusty Rustoleum Lagoon in Satin Finish, and I was finally diggin' it.


I let it all dry for about 30 minutes and then stuck on my new house numbers from Vinyl Concepts.


Next I sprayed over the numbers with some Polyurethane Clear Coat to protect it from those nasty Wisconsin winters I mentioned earlier... I think I'm actually going to go out there and do about 3 more coats of that, just to be sure. 


The total cost for this makeover was only $3...which was the cost of the vinyl numbers. I had all the paint just laying around in the garage. I'm so happy with the result. Makes me all warm and fuzzy inside.


 Its the little things, right?


Friday, July 26, 2013

Project Curb Appeal

Its about time I share a bit of what we've got goin' on outside our house, because lately we've made some major changes and some minor changes and they have made a HUGE difference in the curb appeal of our home. So, let's take a look back at what our house looked like from the street when we bought it in 2010. These photos were taken by the previous owner just before we moved in. Notice the dated front doors and drab trim color. I knew I wanted to change these from the very beginning but we had have so much work to do on the inside of the house that some of the outside changes got put on the back burner.


In this shot you can see the weird little dwarf pine tree just to the right of the front entry stairs. Personally I think it looks like a Christmas tree with the top chopped off and obviously many other people did too. You wouldn't believe how many times people asked me what happened to the top of our tree...But apparently its supposed to look like that. Anyway, I spent a good hour and a half digging that thing out the first summer that we lived here.

We actually got a jump start to "project curb appeal" when our house was robbed this fall. Yes. You read that right. I was home when it happened and it was one of the most terrifying experiences of my life. But that's an entirely different and long story for another time or post. Nonetheless the burglary is what precipitated some major changes, such as new doors and windows. Obviously the windows and doors were as old as the house, which I believe was built in 1946, so that puts them at the ripe old age of 67. Some of the wood was rotting out, we only had one usable screen per room and the storms and screens were a major pain in the you know what to put in and take out. It was time for replacements, that is certain. 

This is what our house looked like this past December right before the windows and doors were installed.


And here is the dated front door and peeling trim.

For the replacement windows, we got several estimates and hunted around to find what we felt was the best quality window at a reasonable price and we ended up going with a company out of Madison that uses Enviroview windows. We had a few bumps along the way with the installation and some errors made by the salesman but all the issues were resolved to our liking and overall we are exceptionally pleased with them... and we were also jumping up and down for the fact that we have 5 years to pay them off with no interest. Sweet deal. 

Here is a view from my bedroom window from last fall.

And here was the view from my bedroom window right after our new windows were installed.


And here is the front of our house just a few weeks after the new windows were installed.  Perhaps you can see one of the errors? The double-hungs in the living room are missing their grids. Eventually that issue was resolved.


Here is the front of the house, after we got our grids in the living room windows...and just after a January blizzard dumped a foot of snow on our driveway.  Gotta love Wisconsin.


Let's take a look at the new front door. I love the Craftsman-style door with the shelf-detail below the windows.


As you can see from the following shots, the door alone wasn't enough.  Our front entry still needed some help.

Well, mainly, it just needed a fresh coat of paint, and it was definitely time to get rid of that drab beige color trim. 


The side door was replaced with the same door as the front door and it looks so much better than what we had. However,  the trim around the door and surrounding the garage door is still in need of a fresh coat of white paint. I thought I would have gotten to that by now but I guess its been quite a busy summer. I'd like to add it to my "honey-do" list, but let's be real. We all know I'll get to it before he does. :) 


Finally in about June I got around to painting the trim around the front door and here's how its looking now.

SO MUCH BETTER!


So...let's take a look at a Then and Now shot of my house from the curb.


I think Project Curb Appeal is going okay so far. 


I'd like to add some black shutters to the living room and bathroom windows.

Next up is a really easy mini-makeover of our mailbox.

Stay tuned.

Sunday, April 14, 2013

Vintage Blue Velvet Sofa | A Fabulous Find


I am in LOVE. With this little ballerina and this vintage sofa. Stay tuned for some living room progress, coming soon.